


Welcome to this comprehensive guide on shifting your application workload to the AWS cloud using the lift and shift strategy. In this project, named "Lift and Shift Application Workload," we will delve into the intricate process of migrating your application, VProfile, from its current infrastructure to AWS. This initiative will not only allow you to harness the power of cloud computing but also modernize your application's infrastructure efficiently.
Topic 1: Introduction
Before we dive into the technical intricacies, let's understand the rationale behind this project. Traditional on-premise setups entail managing numerous physical or virtual machines to support various application services, databases, and auxiliary components. This often translates into high costs, manual processes, and complex management structures involving multiple teams.
The solution lies in embracing cloud computing, specifically AWS, which offers a plethora of services for hosting, managing, and scaling applications. By leveraging AWS, you can eliminate upfront infrastructure costs, automate processes, and gain flexibility and scalability, thereby streamlining operations and reducing maintenance overhead.
Scenario Overview
In our scenario, we have a multi-tier web application stack, VProfile, consisting of services like databases (MySQL), application servers (Tomcat), caching (Memcache), and messaging (RabbitMQ), among others. These services currently reside in our local data center, necessitating extensive management efforts.
To alleviate these challenges, we'll migrate the VProfile stack to AWS using the lift and shift strategy. This involves replicating the existing infrastructure on AWS, ensuring minimal changes to the application codebase.
AWS Architectural Design
Our AWS setup will encompass various services tailored to our application's needs. This includes:
Security Group and key pair: Security groups to control inbound and outbound traffic to our instances, and key pairs for secure SSH access to EC2 instances.
Amazon Certificate Manager (ACM): Manages SSL/TLS certificates.
EC2 Instances: Virtual machines hosting Tomcat, RabbitMQ, Memcache, and MySQL servers.
Route 53: Provides DNS services for routing traffic.
IAM, EBS, etc.: Additional AWS services for security, storage, and management.
S3: Storage for software artifacts and static files.
Target Group :
Elastic Load Balancer (ELB): Distributes incoming traffic across multiple EC2 instances.
Domain Configuration :
AMI and Launch Template :
Auto Scaling: Automatically adjusts the number of EC2 instances based on demand.
This architecture ensures scalability, reliability, and security for our application workload.
Topic 2: Security Group & Key Pairs
Security is paramount in any cloud deployment. We start by configuring security groups to control inbound and outbound traffic to our instances. Additionally, we create key pairs for secure SSH access to EC2 instances.
Security Group Configuration
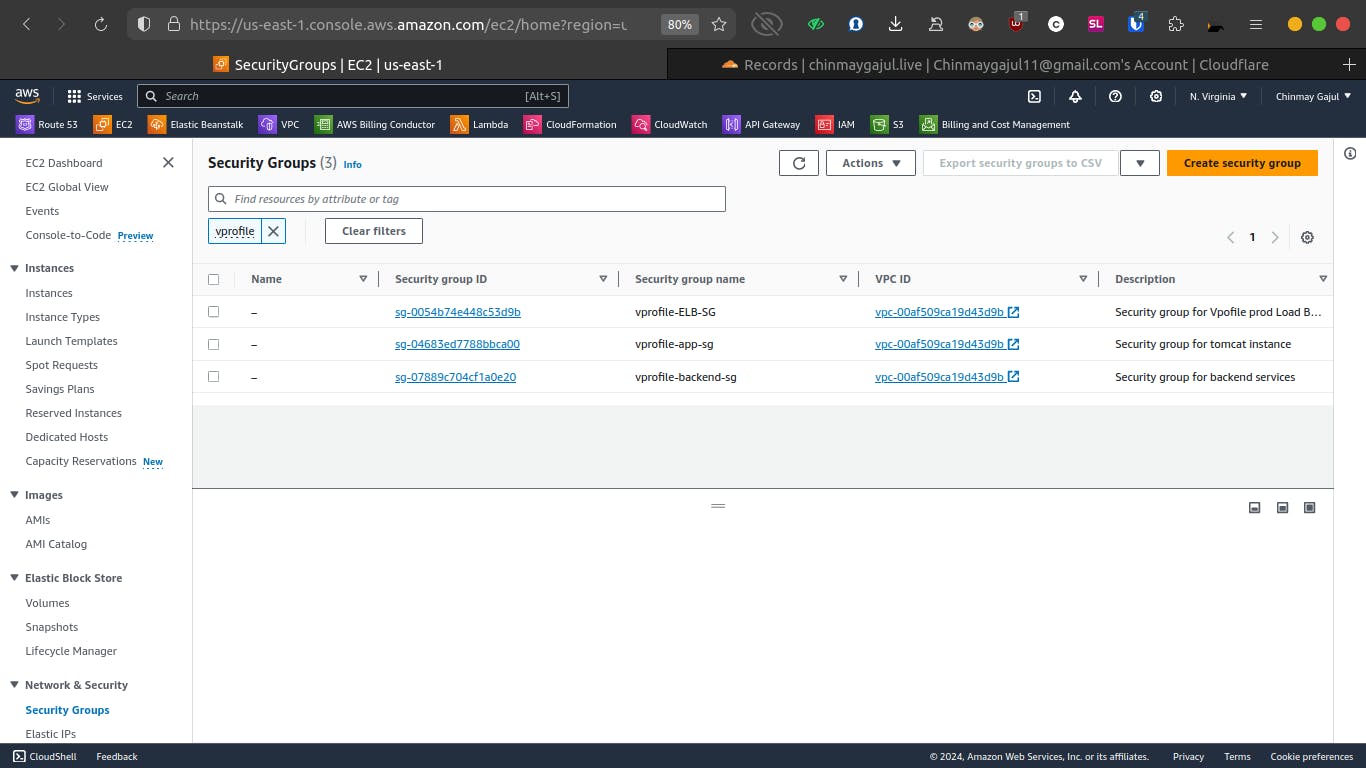
We create three security groups:
Load Balancer Security Group: Allows HTTP (port 80) and HTTPS (port 443) traffic.
Application Security Group: Permits traffic from the load balancer on port 8080.
Backend Security Group: Facilitates communication between application and backend services (MySQL, Memcache, RabbitMQ) on specific ports (3306, 11211, 5672).
Key Pair Creation
We generate a key pair named "vprofile-prod-key" for secure login to our EC2 instances. This key pair ensures secure access to our instances using SSH.

Topic 3: EC2 Instances
With the groundwork laid, we proceed to launch EC2 instances for our application services. We configure each instance with appropriate user data scripts for provisioning.
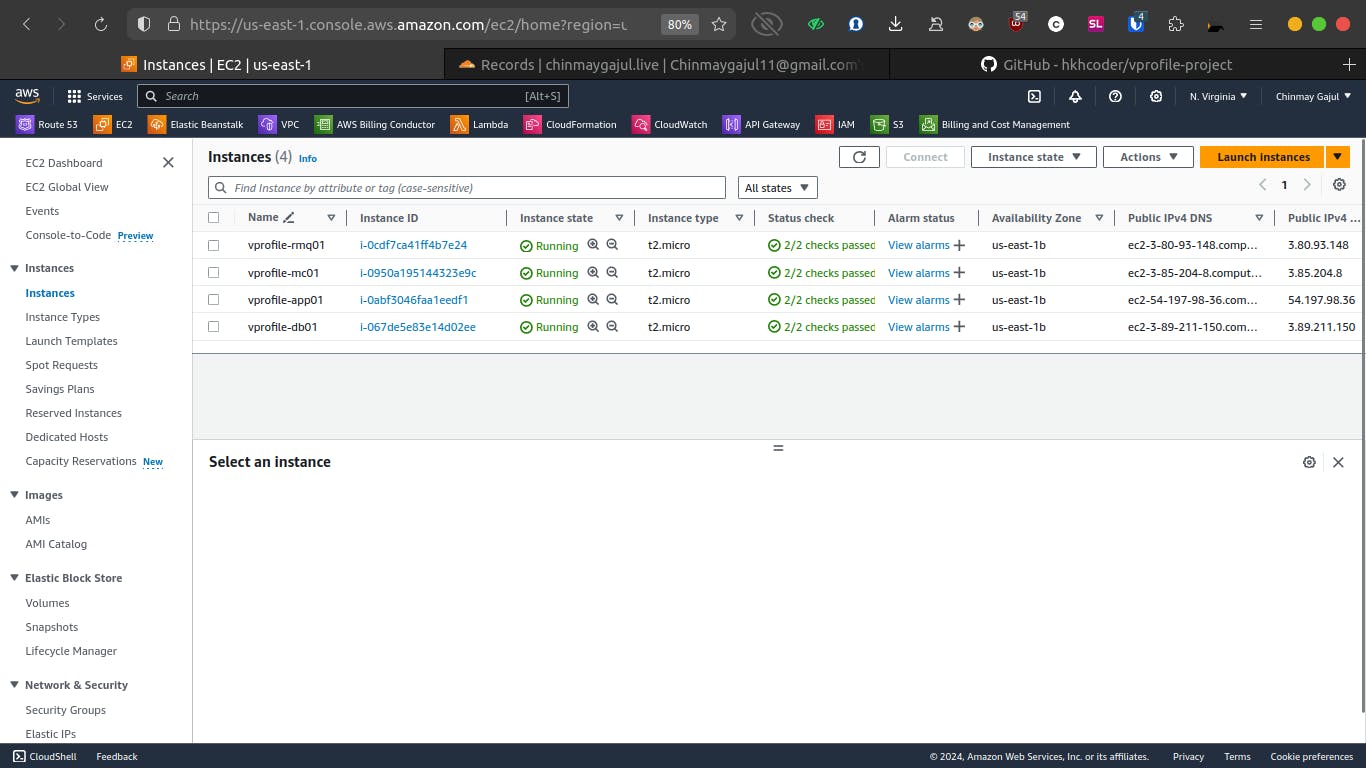
MySQL Server (db01)
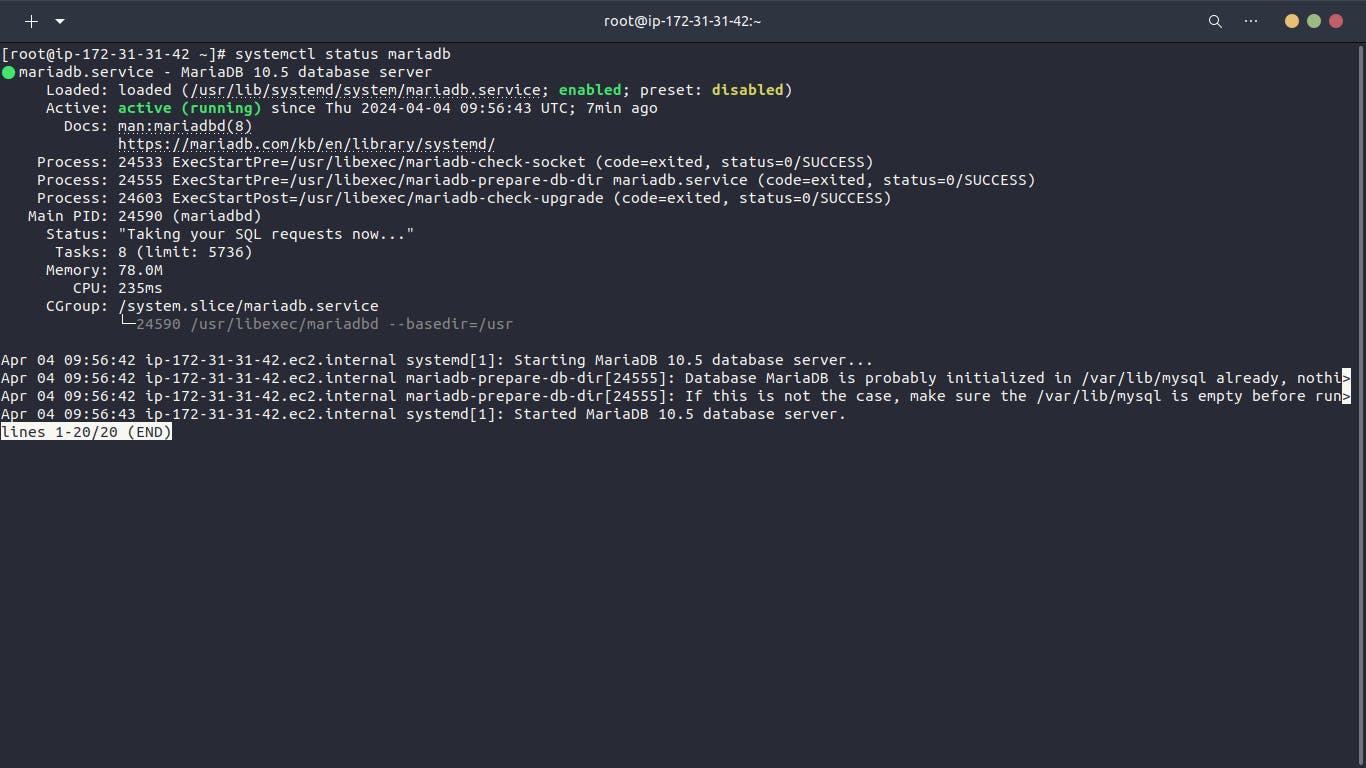
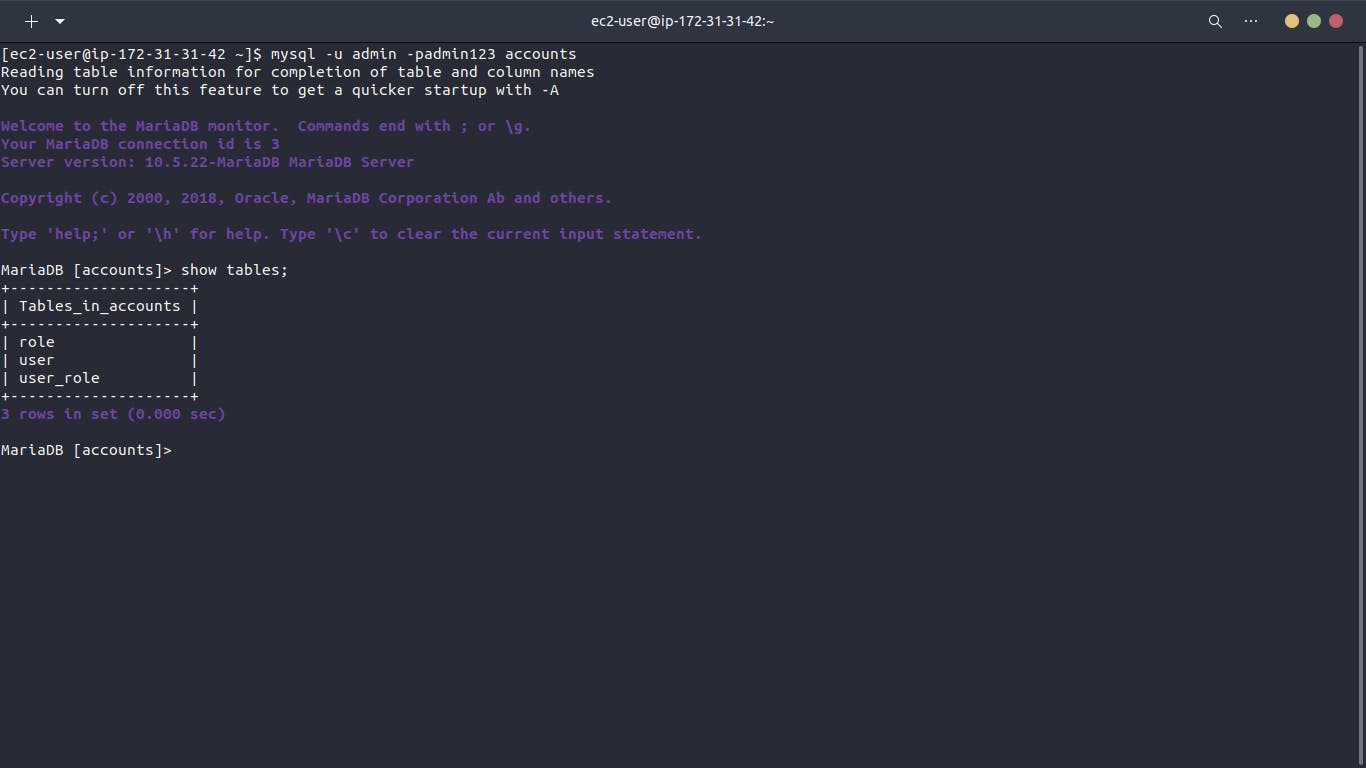
We launch an EC2 instance using AlmaLinux 9 AMI for MySQL server. The instance is tagged as "vprofile-db01" and associated with the backend security group. A user data script installs and configures MariaDB.
Memcache Server (mc01)
Similarly, we launch another EC2 instance for Memcache server (vprofile-mc01) using AlmaLinux 9 AMI. The instance is tagged and configured with the backend security group. A user data script installs and starts the Memcache service.

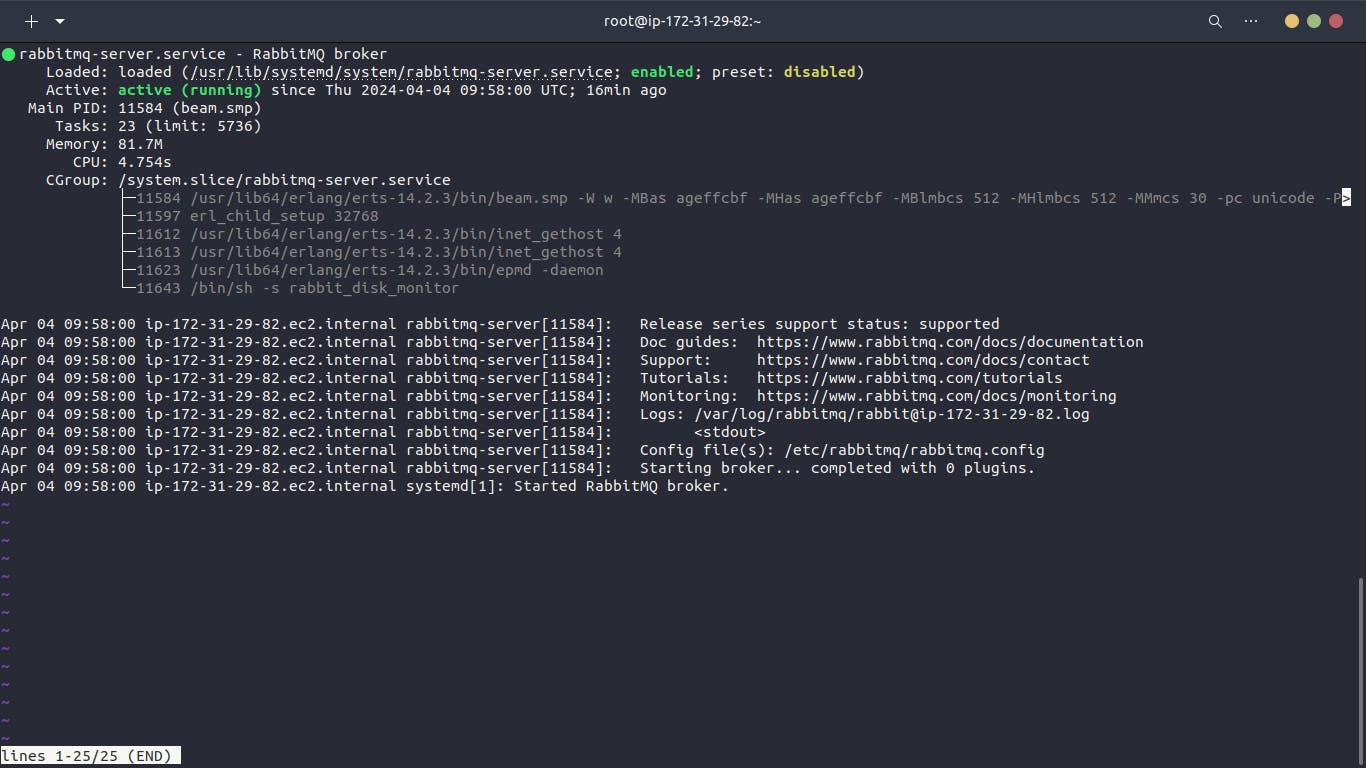
RabbitMQ Server (rmq01)
Next, we provision an EC2 instance for RabbitMQ server (vprofile-rmq01) using AlmaLinux 9 AMI. The instance is tagged and assigned to the backend security group. A user data script installs and initializes RabbitMQ.
Application Server (app01)
Finally, we deploy an Ubuntu-based EC2 instance (vprofile-app01) to host our application (Tomcat). This instance is tagged and associated with the application security group. A user data script installs JDK and Tomcat9.

DNS Configuration with Route 53
To enable seamless communication between application components, we configure DNS records using Route 53. This ensures that our application can resolve backend services using meaningful domain names.
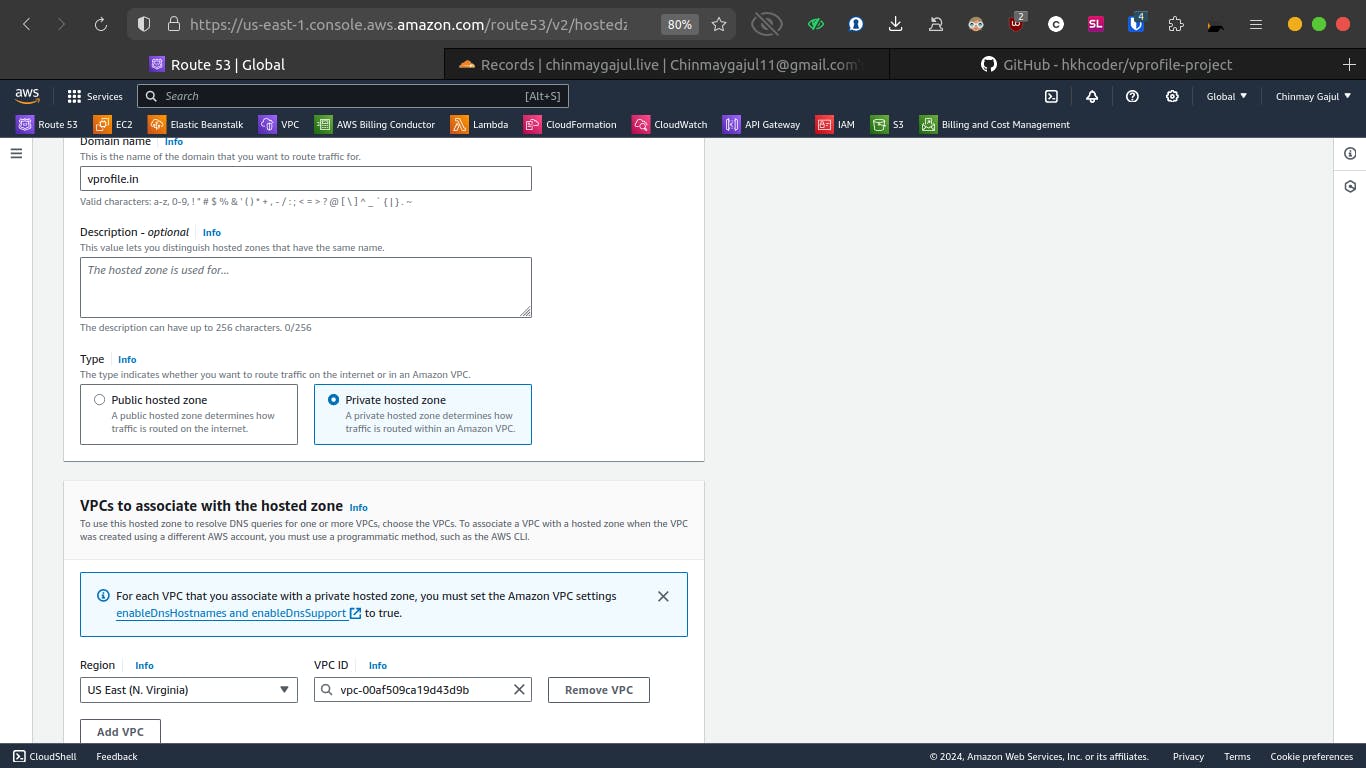
Private Hosted Zone
We create a private hosted zone named "vprofile.in" within Route 53. This zone is associated with our VPC, ensuring internal DNS resolution.
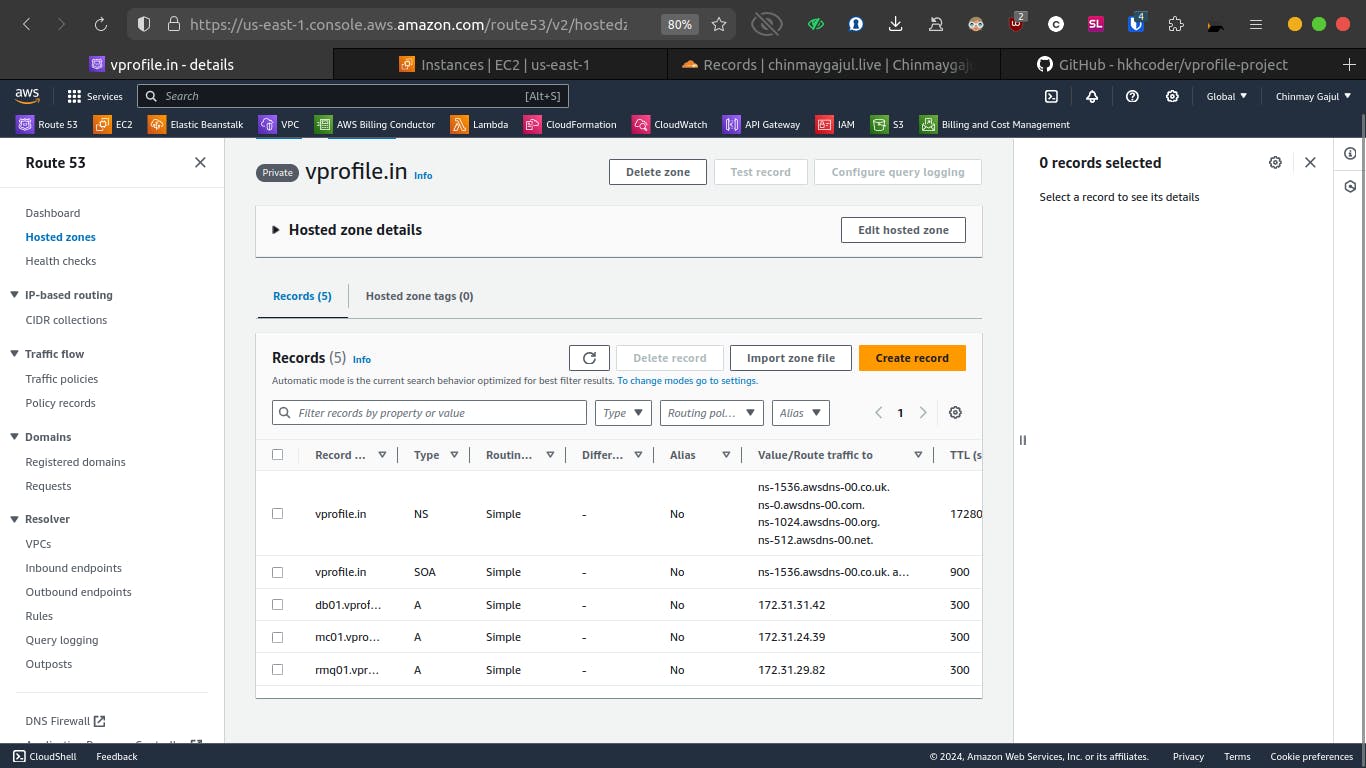
DNS Records
We create DNS records mapping instance hostnames (db01, mc01, rmq01) to their respective private IP addresses. This enables our application to locate backend services using domain names.
Topic 4: Build and Deploy Artifacts
In this segment of our guide, we'll walk through the process of building our application artifact, uploading it to an S3 bucket, and fetching it to the EC2 instance hosting Tomcat. This involves various steps, both on our local machine and within the AWS environment.
Step 1: Configure Development Environment
Open Terminal
For Windows users, open Git Bash from VS Code by pressing
Ctrl+Shift+Pand selecting "Select Default Profile." Choose Git Bash.For macOS users and linux users, open the terminal.
Navigate to Application Properties:
Locate the
application.propertiesfile undersrc/main/resources.Verify and update database configurations as needed.
Step 2: Build Artifact Locally
Build Artifact with Maven:
Open a terminal and navigate to the project directory containing
pom.xml.Execute the command
mvn installto build the artifact.


Step 3: Upload Artifact to S3 Bucket
Prepare AWS CLI:
Ensure AWS CLI, Maven, and JDK are installed.
Confirm AWS CLI installation by running
aws --version.
Create IAM User and S3 Bucket:
Navigate to IAM service in AWS console.
Create a new IAM user with programmatic access and attach the AmazonS3FullAccess policy.
Generate access keys and store them securely.
Configure AWS CLI with access key and secret key.
Create S3 Bucket:
Use AWS CLI to create an S3 bucket with a unique name.
Verify bucket creation in the AWS Management Console.

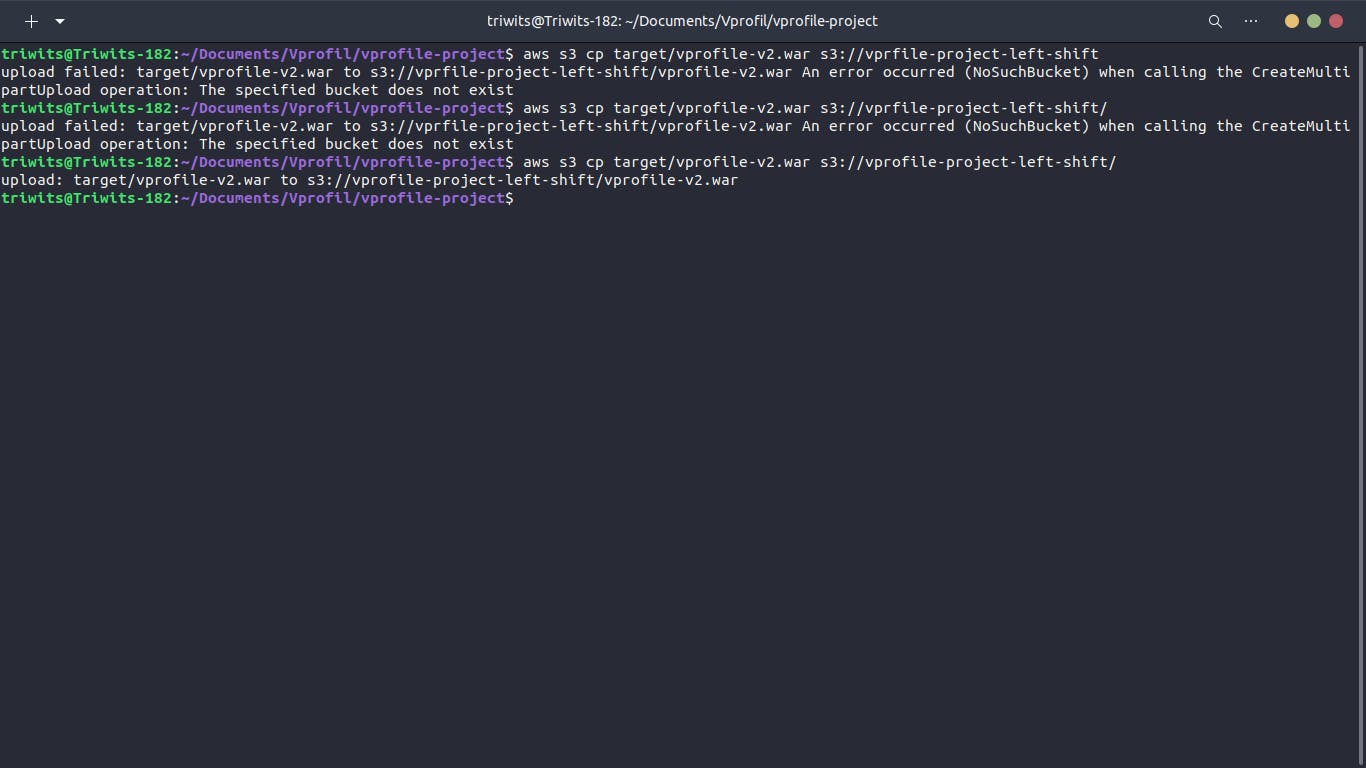
Upload Artifact to S3:
Use AWS CLI to copy the artifact to the S3 bucket.
Confirm successful upload in the S3 bucket.
Step 4: Fetch Artifact to EC2 Instance
Create IAM Role for EC2 Instance:
Navigate to IAM service and create a new role for EC2 with S3 access.
Attach the AmazonS3FullAccess policy to the role.
Associate IAM Role with EC2 Instance:
Modify the EC2 instance settings to include the IAM role created.
Update security group settings if necessary.
SSH into EC2 Instance:
Use SSH to connect to the EC2 instance running Tomcat.
Install AWS CLI on the instance using package manager (apt).

Fetch Artifact from S3:
Use AWS CLI on the EC2 instance to copy the artifact from the S3 bucket.
Verify artifact retrieval in the EC2 instance.
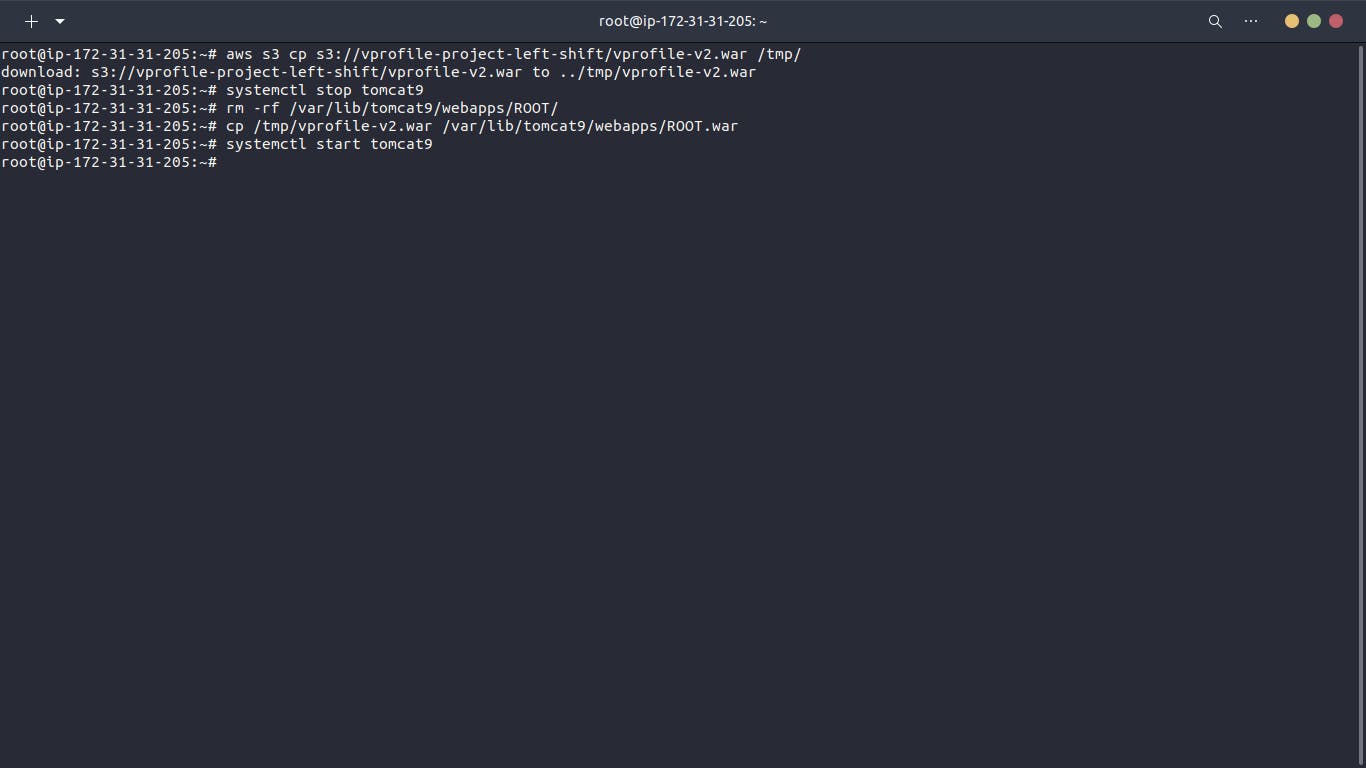
Deploy Artifact to Tomcat:
Stop the Tomcat service on the EC2 instance.
Remove the default ROOT application from the Tomcat webapps directory.
Copy the artifact to the webapps directory with the name "ROOT.war".
Start the Tomcat service.
Validate Deployment:
Check the Tomcat logs for any errors.
Verify the presence of the
application.propertiesfile in the deployed artifact.Test the application functionality by accessing it through the EC2 instance's public IP or domain.
Topic 5: Load Balancer & DNS
Now that our application server is up and running, it's time to set up a load balancer to distribute incoming traffic and configure DNS for easy access to our application.
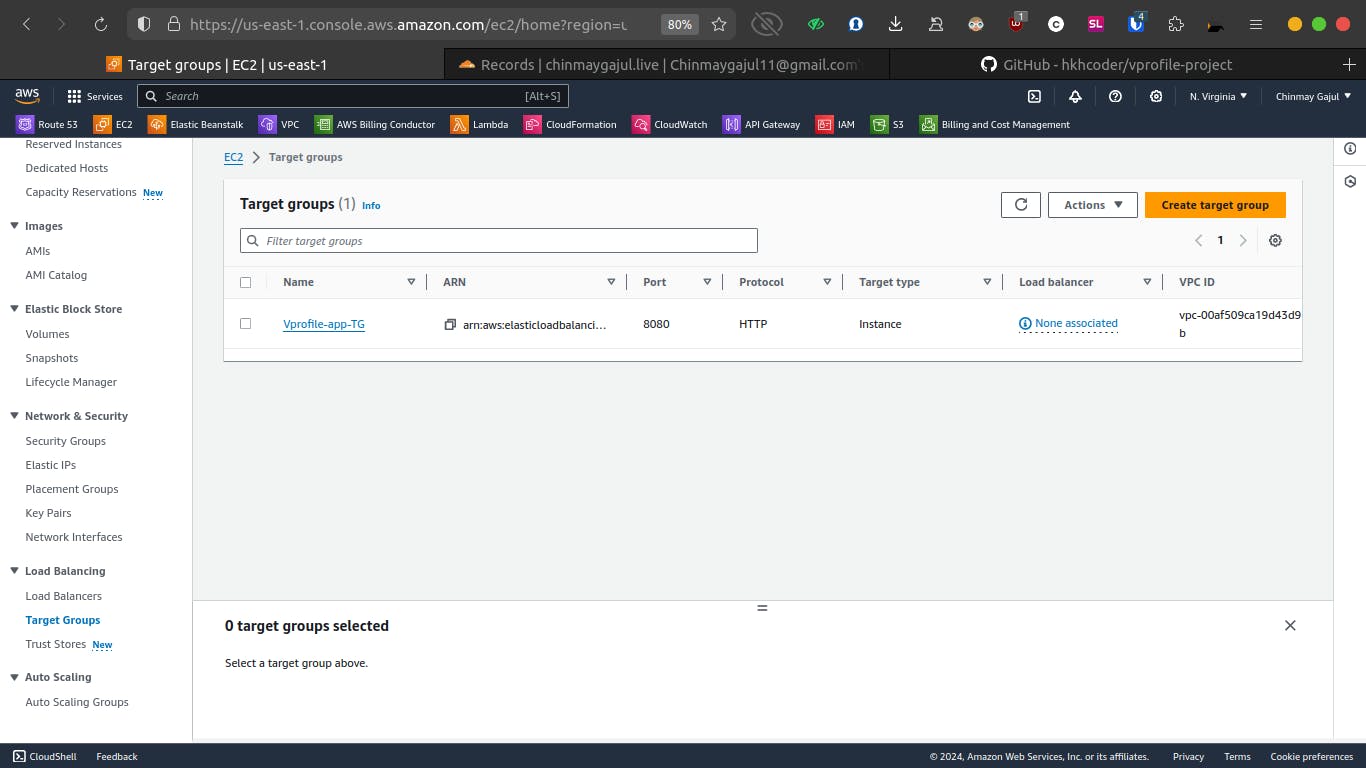
Step 1: Create Target Group
Navigate to EC2 Console:
- Scroll down to the "Load Balancing" section and select "Target Groups."
Create Target Group:
Click on "Create target group" and provide a name (e.g., vprofile-app-TG).
Set the port to 8080, which is where our Tomcat service is running.
Configure health checks to ensure the instances are healthy.
Add Instances to Target Group:
- Select the instances to include in the target group and confirm the port.
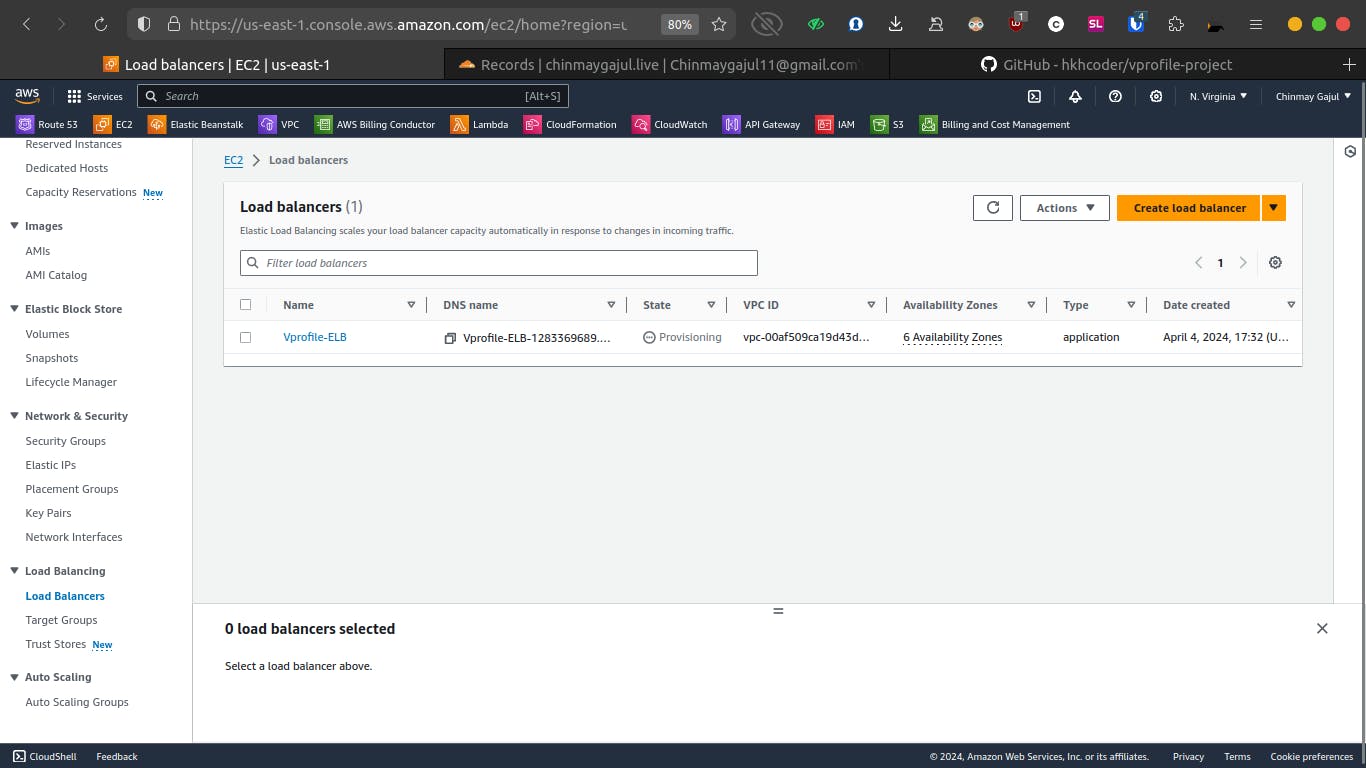
Step 2: Create Application Load Balancer (ALB)
Navigate to Load Balancers:
- Go to the Load Balancers section in the EC2 Console and click on "Create Load Balancer."
Choose Load Balancer Type:
- Select "Application Load Balancer" (ALB) as it's suitable for HTTP and HTTPS traffic.
Configure Load Balancer:
Give the load balancer a name (e.g., vprofile-prod-elb).
Select the appropriate VPC and availability zones.
Assign the previously created target group to the load balancer.
Set Up Listeners:
Add listeners for both HTTP (port 80) and HTTPS (port 443) traffic.
For HTTPS, select the SSL certificate previously configured in ACM.
Step 3: Configure DNS
Obtain Load Balancer Endpoint:
- Once the load balancer is provisioned, copy its DNS name from the AWS console.
Update DNS Records:
Go to your domain provider's dashboard (e.g., Cloudflare,GoDaddy).
Create a new CNAME record pointing to the load balancer's DNS name.
Wait for DNS propagation (typically takes a few minutes to hours).
Validate Domain Setup:
Access your application using the custom domain (e.g.,
https://vprofile.yourdomain.com).Ensure the application loads correctly over both HTTP and HTTPS.

Step 4: Application Testing
Access Application:
- Open a web browser and navigate to the custom domain URL.
HTTP

HTTPS

Login and Functionality Test:
Log in to the application using valid credentials.
Test various features and functionalities to ensure proper operation.


Step 5: Troubleshooting (if needed)
Check Target Group Health:
- Verify that instances are healthy and correctly registered with the target group.
Review Security Group Settings:
- Ensure that security groups allow traffic on ports 8080 and 443 as needed.
Inspect Load Balancer Logs:
- Review ALB access logs for any errors or issues.
Topic 6: Autoscaling Group
In this guide, we will walk through the process of setting up an autoscaling group for our Tomcat instance, ensuring that our application can automatically scale out and scale in based on the load.
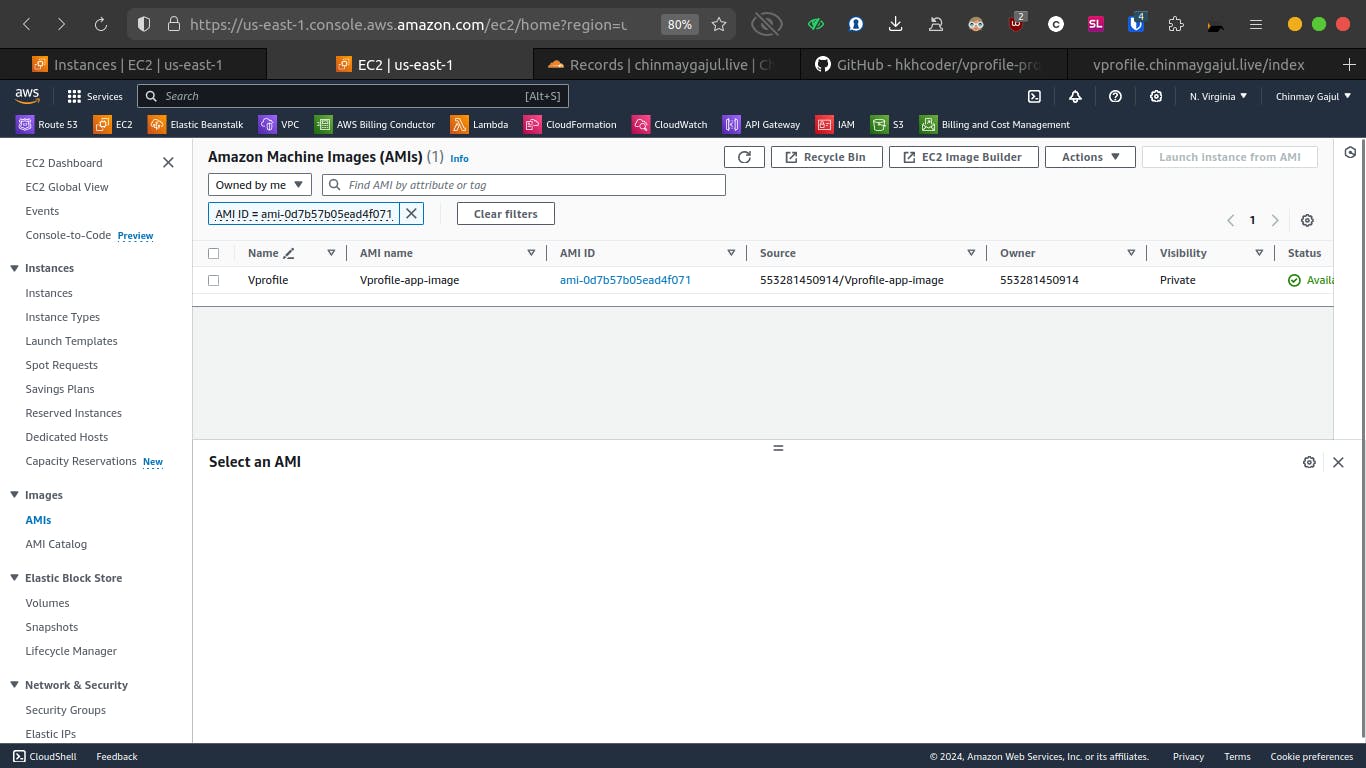
Step 1: Create AMI (Amazon Machine Image)
The first step is to create an AMI of our instance:
Navigate to the EC2 Console.
Select the instance you want to create an AMI for (e.g., app01).
Click on "Actions," then "Image," and select "Create image."
Provide a name for the image (e.g., vprofile-app-image) and create the image.

Step 2: Create Launch Template
Next, we'll create a launch template to specify how instances should be launched:
Go to the EC2 Console and navigate to "Launch Templates."
Click on "Create launch template."
Give the template a name (e.g., vprofile-app-LC) and description.
Specify the AMI created earlier, instance type, key pair, security group, and any other necessary configurations.
Ensure to add appropriate tags for identification.
Configure advanced details such as IAM role for instances.
Create the launch template.

Step 3: Create Autoscaling Group
Now, we'll create the autoscaling group:
Navigate to the Autoscaling Groups section in the EC2 Console.
Click on "Create Auto Scaling group."
Provide a name for the autoscaling group (e.g., vprofile-app-ASG).
Select the launch template created earlier.
Choose the desired VPC and availability zones.
Specify load balancer settings, attaching the group to an existing load balancer or target group.
Configure health checks for instances.
Decide on the capacity settings, including desired, minimum, and maximum instances.
Set up scaling policies based on metrics like CPU utilization.
Review and confirm the settings, then create the autoscaling group.

Step 4: Validate Autoscaling Group
Wait until the autoscaling group stabilizes:
Monitor the autoscaling group until it stabilizes, launching and terminating instances as needed.
Check the instances section in the EC2 Console to ensure instances are healthy.
Verify that instances are added to the target group or load balancer as expected.
Enable stickiness in the target group settings if necessary for session persistence.


Topic 7: Validation & Summary
Once the ASG stabilizes, validate its functionality. Check the instance's status in the target group to ensure they're healthy. Verify the application's accessibility via the URL.
Summary: Let's recap our journey:
Users access the application via a URL pointing to the load balancer endpoint, ensuring secure HTTPS connections managed by ACM.
The application load balancer directs traffic to Tomcat EC2 instances on port 8080, residing in specific security groups.
Backend services like Memcached, RabbitMQ, and MySQL are accessible within a unified security group.
Conclusion:
By following this guide, you'll have a comprehensive understanding of how to build a scalable and resilient infrastructure on AWS. From provisioning EC2 instances to implementing Auto Scaling Groups, you'll be well-equipped to design and deploy robust cloud architectures for your applications.